Watching a video on lighting set up really helped us in coming up
with ideas on how to light our own music video, especially in the performance
scenes. High key lighting provides a ‘flawless’ and ‘glamorous’ appearance as
the face is highlighted and there aren’t many shadows and a low amount of
contrast. Soft lighting can also be used to give this effect as well as
lighting a scene to give a ‘natural’ effect as opposed to using harsh lighting.
Natural lighting is not commonly used and is not always completely natural as
reflectors are used to reflect the light onto the intended subject and so they
appear highlighted and so this helps to create a star image.
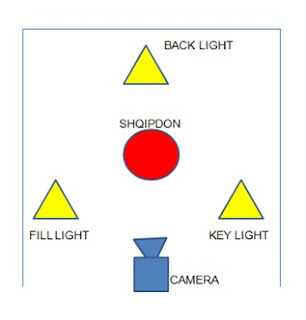
 Three point
lighting is commonly used in music videos, especially in a performance
sequence. Key lighting is used to highlight the subject, this helps to create a
star image. The fill light gives the subject and scene a more three-dimensional
effect and so it doesn’t look flat. The back light creates a contrast and so
you get more shadows with by using this light. The back light is also often
diegetic as it is mostly used in shot, it can also be used to create lens flares
and adds depth to the shots as well as making the shots appears more
interesting blurring the background and having the subject in focus creates a
shallow or deep depth of focus, depending on the camera angle.
Using colour
correction enables you to have a darkened background and so the subject appears
more dominant within the frame and so this adds to the star image. Having a
shot of lights or even having the lights slightly in the shot and out of focus
adds depth to the shot and makes the shot more interesting. I found this
tutorial to be helpful for our music video as it would help us to light our
scenes in both conventional and interesting ways which will hopefully make our
music videos more professional.
No comments:
Post a Comment